Thursday, January 28, 2010

Dorie Greenspan's World Peace Cookies


This recipe has always interested me. Being renamed "world peace cookies" for their delicious taste and assumed ability to create world peace through their daily enjoyment. I've read about them on almost all of my favorite food blogs so it was definitely time to see if they live up to their legend. And no big surprise, they were amazzzzing. I now understand the name and plan to make these next time I get myself in trouble with someone...

These cookies are chocolate sables, the french version of shortbread. But, what makes these so good is the amount of chocolate and sea salt that leaves you wanting more.

World Peace Cookies
Baking: From My Home to Yours, Dorie Greenspan

1 1/4 cups all-purpose flour
1/3 cup unsweetened cocoa powder
1/2 teaspoon baking soda
1 stick plus 3 tablespoons (11 tablespoons) unsalted butter, at room temperature
2/3 cup (packed) light brown sugar
1/4 cup sugar
1/2 teaspoon fleur de sel or 1/4 teaspoon fine sea salt
1 teaspoon vanilla extract
5 ounces bittersweet chocolate, chopped into chips, or a generous 3/4 cup store-bought mini chocolate chips

Makes about 36 cookies.

Sift the flour, cocoa and baking soda together.

Working with a stand mixer, preferably fitted with a paddle attachment, or with a hand mixer in a large bowl, beat the butter on medium speed until soft and creamy. Add both sugars, the salt and vanilla extract and beat for 2 minutes more.

Turn off the mixer. Pour in the flour, drape a kitchen towel over the stand mixer to protect yourself and your kitchen from flying flour and pulse the mixer at low speed about 5 times, a second or two each time. Take a peek — if there is still a lot of flour on the surface of the dough, pulse a couple of times more; if not, remove the towel. Continuing at low speed, mix for about 30 seconds more, just until the flour disappears into the dough — for the best texture, work the dough as little as possible once the flour is added, and don’t be concerned if the dough looks a little crumbly. Toss in the chocolate pieces and mix only to incorporate.

Turn the dough out onto a work surface, gather it together and divide it in half. Working with one half at a time, shape the dough into logs that are 1 1/2 inches in diameter. Wrap the logs in plastic wrap and refrigerate them for at least 3 hours. (The dough can be refrigerated for up to 3 days or frozen for up to 2 months. If you’ve frozen the dough, you needn’t defrost it before baking — just slice the logs into cookies and bake the cookies 1 minute longer.)

GETTING READY TO BAKE: Center a rack in the oven and preheat the oven to 325 degrees F. Line two baking sheets with parchment or silicone mats.

Working with a sharp thin knife, slice the logs into rounds that are 1/2 inch thick. (The rounds are likely to crack as you’re cutting them — don’t be concerned, just squeeze the bits back onto each cookie.) Arrange the rounds on the baking sheets, leaving about 1 inch between them.

Bake the cookies one sheet at a time for 12 minutes — they won’t look done, nor will they be firm, but that’s just the way they should be. Transfer the baking sheet to a cooling rack and let the cookies rest until they are only just warm, at which point you can serve them or let them reach room temperature.

SERVING: The cookies can be eaten when they are warm or at room temperature — I prefer them at room temperature, when the textural difference between the crumbly cookie and the chocolate bits is greatest — and are best suited to cold milk or hot coffee.

STORING: Packed airtight, cookies will keep at room temperature for up to 3 days; they can be frozen for up to 2 months.


Wednesday, January 27, 2010

Lemon Lemon Loaf


I just spent a lovely week in Puerto Vallarta, Mexico. I enjoyed the sun, beach, and Mexican delicacies like tacos and tequila. After eating and drinking my way through the entire week I vowed upon my return that I would detox from the sugar and carbohydrate overload. I also decided I was going to dig up a recipe for some kind of "healthy-ish" treat.

Well, that whole plan went right out the window. Instead, I made the most delicious lemon lemon loaf from the Baked: New Frontiers in Baking cookbook. It's moist, tart, perfectly sweet and full of artery clogging goodness.

Enjoy.

Did I mention that this recipe uses
8 whole eggs, a pound of butter AND sour cream?

Lemon Lemon Loaf
adapted from Baked: New Frontiers in Baking

For the Lemon Cake:
1 1/2 cups cake flour
1 1/2 cups all-purpose flour
2 teaspoons baking powder
1/4 teaspoon baking soda
1 teaspoon salt
2 1/4 cups sugar
8 large eggs, at room temperature
1/4 cup grated lemon zest (from about 4 lemons)
1/4 cup fresh lemon juice
2 cups (4 sticks) unsalted butter, melted and cooled
1/2 cup sour cream, at room temperature
2 teaspoons pure vanilla extract

For the Lemon Syrup:
1/3 cup fresh lemon juice
1/3 cup sugar

For the Lemon Glaze:
2 cups confectioners' sugar, sifted, or more if needed
4 to 6 tablespoons fresh lemon juice

Make the Lemon Cakes
:
1. Preheat the oven to 350 degrees F. Spray the sides and bottom of two 9-by-5-by-3-inch loaf pans with nonstick cooking spray. Line the bottom with parchment paper and spray the paper.

2. Sift both flours, baking powder, baking soda, and salt together in a medium bowl.

3. Put the sugar, eggs, lemon zest, and lemon juice in a food processor and pulse until combined. With the motor running, drizzle the butter in through the feed tube. Add the sour cream and vanilla and pulse until combined. Transfer the mixture to a large bowl.

4. Sprinkle the flour mixture, one third at a time, folding gently after each addition until just combined. Do not overmix.

5. Divide the batter evenly between the prepared pans. Bake in the center of the oven for 20 minutes, rotate the pans, reduce the oven temperature to 325 degrees F., and bake for another 30 to 35 minutes, or until a toothpick inserted in the center of the loaf comes out clean.

6. Let cool in the pans for 15 minutes.

Meanwhile, make the Lemon Syrup:
1. In a small saucepan over medium heat, heat the lemon juice and sugar until the sugar is completely dissolved. Once dissolved, continue to cook for 3 more minutes. Remove from the heat and set aside.

2. Line a half sheet pan with parchment paper or Silpat and invert the loaves onto the pan. Use a toothpick to poke holes in the tops and sides of the loaves.

3. Brush the tops and sides of the loaves with the lemon syrup. Let the syrup soak into the cake and brush again. Let the cakes cool completely, at least 30 minutes.

The soaked but unglazed loaves will keep, wrapped in two layers of plastic wrap and frozen, for up to 6 weeks.

Make the Lemon Glaze:
1. In a small bowl, whisk together the confectioners' sugar and 4 tablespoons of the lemon juice. The mixture should be thick but pourable. If the mixture is too stiff, add up to another 2 tablespoons lemon juice and whisk again, adding small amounts of lemon juice and/or confectioners' sugar until you get the right consistency. Pour the lemon glaze over the top of each loaf and let it drip down the sides. Let the lemon glaze harden, about 15 minutes, before serving.


Saturday, January 23, 2010

Brooklyn Rose Cupcakes


It's about time someone posted something on this blog! I know I've been extremely busy with work, Nikki has been extremely busy with work, and Krissy has been extremely busy... working on her tan in Mexico. Ha. All in all, a rough couple of weeks for the Cookie Confessions girls.

I actually had enough downtime today for some quality kitchen time. I volunteered myself earlier this week to bake cupcakes for Julia and Kristen's birthday, so I made sure to keep my schedule clear today so I could fully embrace my baking responsibility.

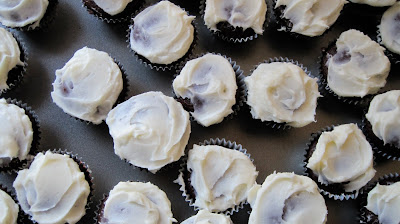
What did I decide to bake for the occasion? Mini Red Velvet Cupcakes- from scratch. This was my first attempt at Red Velvet Cupcakes, and while they tasted delicious, they actually looked more like Brown Velvet Cupcakes. That's because I didn't read the recipe close enough and missed the part about them being an adaptation of a Mocha Cake. Oops.

And it turns out that my frosting technique is quite unique. For some reason, when I swiped the frosting across the cupcake tops, they all ended up looking like roses. So I named these creations Brooklyn Rose Cupcakes. And there you have it.


Here's the entire time-consuming recipe for those who feel inclined. Enjoy!

Red Velvet Cake (adapted from here)

1 cup dark brown sugar, packed
1/2 cup white sugar
3/4 cup butter, softened
2 eggs
2 cups cake flour
1/2 cup + 2 tbsp cocoa
1 tsp baking soda
1 tsp baking powder
1 tsp salt
1 cup buttermilk
1 tbsp red food colouring
2 tsp vanilla extract
1 tsp white vinegar

1. Preheat oven to 350°F. Grease 2 9″ baking pans and line the bottoms with parchment paper. Set aside.
2. Beat butter until fluffy, add sugar and beat until incorporated.
3. Add eggs one at a time, scraping down sides of bowl until fully incorporated.
4. In large bowl, mix together flour, cocoa, baking soda, baking powder and salt. In separate bowl, mix together buttermilk, vinegar, vanilla and food coloring.
5. Add half of dry ingredients to butter/egg mix, then half of wet. Repeat process until all is mixed together.
6. Pour into lined baking sheets and bake for 22-25 minutes.
7. Remove from oven and allow to cool on baking rack in pans for 5-10 minutes. Remove from pans by inverting onto cooling rack and allow to cool completely before decorating.


Cream Cheese Frosting (adapted from here)

1/2 cup of butter (1 stick) at room temperature
8 ounces of Philadelphia cream cheese (1 package) at room temperature
2-3 cups of powdered sugar
1 teaspoon of vanilla

1. With an electric mixer, mix the butter and cream cheese toegther, about 3 minutes on medium speed until very smooth. Scrape down the sides and bottom of the bowl to ensure even mixing.
2. Add the vanilla extract and mix. Slowly add the powdered sugar. Keep adding until you get to desired sweetness.
3. Spread on with a blunt knife or spatula.

Tuesday, January 12, 2010

Baking for My Life - Peanut Butter Cup Brownies

Apologies for the terrible picture quality, but apparently my camera, kitchen and life in general prevent me from taking decent pictures.

I made up my mind to bake tonight for a couple reasons. 1) I was threatened by Katie and Krissy that if I didn't post this week, I would be kicked off the blog for good. My face would be blacked out, and Atlanta would be stricken from the site. 2) One of our favorite partners is visiting from the DC office and residing on our hall for the week. Hopefully these treats will continue to endear him to us.

Due to the aforementioned reasons, I paged through one of the cookbooks I got for Christmas (which I love) and tried to find a recipe that I had most of the ingredients for. Brownies won the battle as I was only missing one egg and an ounce of chocolate. As I was making them, I remembered my last visit to NYC during Katie's first stint living there. We went to Fat Witch Brownies in some market that I can't remember the name of. They were some of the tastiest brownies I've ever had, and I spent the majority of my time crossing my fingers that these brownies would turn out even half as good. Turns out they are at least half as good. Bake these simple to make treats if you want to impress your friends with something that didn't come from a box.

Peanut Butter Cup Brownies
Adapted from How To Be A Domestic Goddess

1 2/3 cups unsalted butter, softened
13 ounces best bittersweet chocolate
6 large eggs
1 tablespoon vanilla
1 2/3 cups sugar
1 1/2 cups all-purpose flour
1 teaspoon salt
1/2 bag mini peanut butter cups (you can add more depending on your taste)

Preheat the oven to 350 degrees. Line a 13x9 pan with foil or parchment. Melt the butter and chocolate together in a large pan. In a bowl, beat eggs, vanilla and sugar. Measure the flour into another bowl and add the salt.

When the chocolate mixture has melted, let it cool a bit before beating it into the eggs and sugar. Add flour in parts and beat until smooth. Coarse chop the mini peanut butter cups and fold into the batter. Pour into the lined pan.

Bake for about 25 minutes. When it's ready, the top should be dried to a paler brown speckle, but the middle still dark and dense and gooey. You may think they're not done yet, but they'll continue to cook as they cool. And who doesn't like brownies that might not be completely cooked? Makes a maximum of 48.

Sunday, January 10, 2010

Paris in Park Slope


Ham and Cheese Croissant


I am not one to make New Year's resolutions, but this year I am going to give it a try. In 2010, I am going to deeply explore the borough in which I live: Brooklyn. Most of my days and nights are spent in Manhattan, causing me to miss out on many of the great bakeries, restaurants, bars and stores that are right outside my door. So this year, I am going to try and undertake frequent local explorations.

I ventured out into the 20 degree weather this morning in search of a delicious pastry. After about a 10 minute walk, I stumbled upon Colson Patisserie, a delightful French bakery in Park Slope.


The pastries were very authentic. I ordered a Morning Roll, a light, sweet and flaky roll that paired perfectly with my cup of morning coffee. Dan ordered a ham and cheese croissant. While I don't particularly like savory pastries, I have to admit that the croissant was delicious! And although I didn't have a chance to try one on my first visit, Colson Patisserie is apparently famous for their Financiers, the little French cookie cakes. I will definitely be back for some of those!

Morning Roll

Some more goodies at Colson Patisserie

What is your favorite local spot to grab a morning pastry?

Tuesday, January 5, 2010

Lessons in Waiting


Good things come to those who wait.

Well... that is not always the case. I recently lost out on a great opportunity because I waited too long. Shocking because I am not a person who likes to wait. I had finally made the decision to go to pastry school, I was so excited and sure of my decision, but unfortunately because I waited (literally) until the last minute the program was full.

Today however, trying to practice my pastry patience, a skill I'm trying to develop- I enjoyed the slow process of making chocolate croissants. Timing is of the essence with pastry; waiting for the dough to rise, chill, rise again and rise once more, the process was long but the results were tasty.

For now my pastry school adventure will be put on hold, in the meantime I will try to learn and practice patience... a new years resolution perhaps?

Chocolate Croissants
From The Modern Baker by Nick Malgieri

Uhh, no one is going to take the time to make these... the recipe is super long. I will type it up, but at a later date. (see... my patience really does need work)

Sunday, January 3, 2010

A New Year


Happy New Year to all!

Photo credit from here

Couldn't be happier that 2010 has arrived.

We have a lot of exciting things planned for Cookie Confessions this year- starting with a much needed site re-design! Enjoy the new page, and we'll post some fresh news and baked goods this week. Until then, enjoy our new look.