Sunday, February 21, 2010

Blueberry Muffins


Classics are called classics for a reason. They are those go-to recipes that always come out just right, resulting in a baked good that can please just about every palette out there, from the pickiest to the most refined eaters.

My last baking attempt was vegan chocolate chip cookie sandwiches, as I tried to bake outside of the "classic" category. I went out and bought fancy ingredients (Xantham gum?) and spent hours concocting the dairyless baked goods, debuting them at my friend's Super Bowl party. Every time I watched someone take a bite, I could tell that they had to try very hard to chew and swallow the treats, forcing out an "Mmm, so good!" to make me feel good about myself. A little advice, friends: Next time, be honest with me. I am a big girl. I can take it. :o)

This week I decided to bake something I knew would taste perfect. These little blueberry muffins are perfect for a Sunday morning! Or a Sunday afternoon snack. Or a Sunday evening dessert. Or a Monday morning breakfast... Enjoy!

Blueberry Muffins
adapted from here

1/2 cup butter, softened
1 cup sugar
2 eggs
1/2 cup plain yogurt
1 tsp. vanilla
2 cups flour
2 tsp. baking powder
1/2 tsp. baking soda
1/2 tsp. salt
2 1/2 cups blueberries, fresh or defrosted frozen
1 tbs. flour
3 tbs. sugar

Preheat oven to 375 degrees. Line muffin tin with paper liner and grease rims with butter. I used silicone muffin cups, so no greasing was required.

Cream butter and 1 cup sugar until light and fluffy. Add eggs one at a time, mixing well after each addition. Stir in vanilla. Sift dry ingredients and add alternately with yogurt. Mash 1/2 cup blueberries and mix into batter. Toss remaining blueberries with 1 tbs. flour and fold into batter by hand. Fill muffin cups to top. Sprinkle the top of the muffins with brown sugar before placing into oven. Bake 20-25 minutes or until a tooth pick inserted in center comes out clean. Cool for 30 minutes.

Wednesday, February 17, 2010

A Farewell to Chocolate.


As the Lenten season begins I've made the choice to give up chocolate for the next forty days. Yes it will be difficult, yes I'm already feeling a sense of emptiness and regret... and yes it is only day one. Uhhh, this might be harder then I thought.

Although I'm not giving up all sweets, chocolate is near and dear to my heart. When I bake I pretty much always want to make something with chocolate. I want need chocolate every day. It's a real problem.

However, I see this chocolate free period as a great opportunity to work on baking those healthy-ish treats I've been talking about for some time now. While chocolate has been in the picture I've had no reason to cheapen my baking experience with healthy alternatives.

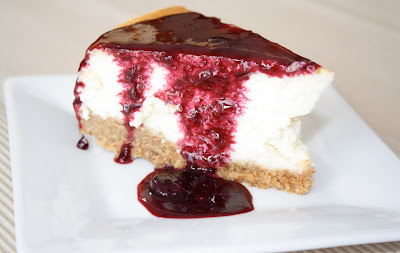
We enjoyed this deliciously creamy cheesecake on Valentine's day. I definitely redeemed myself after the red-velvet fiasco.


Super Creamy Cheesecake
Adapted from this highly rated recipe on Allrecipes.com

Ingredients:
  • 15 graham crackers, crushed
  • 2 tablespoons butter, melted
  • 4 (8 ounce) packages cream cheese
  • 1 1/2 cups white sugar
  • 3/4 cup milk
  • 4 eggs
  • 1 cup sour cream
  • 1 tablespoon vanilla extract
  • 1/4 cup all-purpose flour
  • Directions:

Preheat oven to 350 degrees F. Grease a 9 inch springform pan.

In a medium bowl, mix graham cracker crumbs with melted butter. Press onto bottom of springform pan.

In a large bowl, mix cream cheese with sugar until smooth. Blend in milk, and then mix in the eggs one at a time, mixing just enough to incorporate. Mix in sour cream, vanilla and flour until smooth. Pour filling into prepared crust. Bake in preheated oven for 1 hour. Turn the oven off, and let cake cool in oven with the door closed for 5 to 6 hours; this prevents cracking. Chill in refrigerator until serving.


Sunday, February 14, 2010

Nikki Did It - Red Velvet Whoopie Pies


Typically, when the phrase "Nikki did it" is uttered, it's because someone has done something wrong, and I'm getting blamed for it. The practice of blaming me for everything started on a trip to Minnesota one summer and has been holding strong ever since. I, in fact, get blamed for things that go wrong even when I'm in another state.

But tonight, I'm going to say Nikki did it because I made some pretty fantastic red velvet whoopie pies. These babies were pictured in the trash in Krissy's last post, "Love Stinks." Me and my friend Ashley decided to make these today because love does stink, and we thought that these would make it a little more palatable. I couldn't have made these work without her; she did an awesome job piping these into the heart-shaped pattern. One tip: the batter doesn't spread, so pipe to the very edge of your stencil. We started out leaving some room for expansion, but the cookies that were bigger were much tastier. Also, once you pipe the batter, take a knife and try to evenly spread the batter, otherwise they will look like they've been piped and resemble an organ that will remain unnamed. Of course, my pictures are never as good as Krissy's and pretty blurry, but that's all I've got.

Red Velvet Whoopie Pies
Adapted from Annie's Eats

Cookies:
2 cups all-purpose flour
2 tablespoons cocoa powder, unsweetened
1/2 teaspoon baking powder
1/4 teaspoon salt
8 tablespoons butter, unsalted, room temperature
1 cup light brown sugar, packed
1 large egg
1 teaspoon vanilla extract
1/2 cup buttermilk, room temperature
1 ounce red food coloring

Frosting:
8 ounces cream cheese
5 tablespoons butter, room temperature
2 teaspoons vanilla extract
2 cups confectioners' sugar

Preheat the over to 375 degrees. Create a heart template, and trace evenly spaced hearts onto pieces of parchment paper about one inch apart. Make enough for two cookie sheets. Place the parchment on the cookies sheets so that the side you have drawn is facing down, and set aside.

In a medium bowl, whisk together the flour, cocoa powder, baking powder and salt. In the bowl of a stand mixer with the paddle attachment, cream together the butter and brown sugar on medium-high speed until light and fluffy, about two minutes. Beat in the egg until incorporated, scraping down the sides of the bowl. Blend in the vanilla. With the mixer on low speed, beat in about third of the dry ingredients, followed by half of the buttermilk, beating each addition just until incorporated. Repeat so that all the buttermilk has been added and then mix in the final third of the dry ingredients. Do not overbeat. Blend in the food coloring.


Transfer the batter to the pastry bag fitted with a large plain round tip. Pipe the batter onto the parchment paper using the heart tracings as a guide. Bake 8-9 minutes or until the tops are set, rotating the baking sheets halfway through. Allow the cookies to cool on the baking sheets at least 10 minutes and transfer to a cooling rack. Repeat with any remaining batter. Allow cookies to cool completely before frosting.


To make the frosting, in the bowl of a stand mixer fitted with the paddle attachment beat the cream cheese and butter on medium-high speed until well combined and smooth, about 2-3 minutes. Mix in the vanilla extract. Gradually beat in the confectioners' sugar until totally incorporated, increase the speed and beat until smooth.

Spread frosting over the bottom of one cookie, then sandwich another cookie on top (we overfilled ours because you can never have too much cream cheese frosting). To store, refrigerate in an airtight container.

Friday, February 12, 2010

In Loving Memory - Lemon Meringue Pie

The past two weeks have been extremely emotional for me and my parents. Last week, we lost Billy "B" Miret, one of my parent's best friends. B was a best friend to so many, and I've always looked up to him. I was lucky enough to have the opportunity to say goodbye to him and let him know how much I loved him, even though he wasn't able to respond back. That night I told him that I know that his love and support made me into the person I am today. He watched me grow up, and it's hard to imagine life without him. That being said, B would never want us to be sad; in fact, he'd only want us to remember all of the great times that we had together (having a bad time just wasn't possible if he was around).

Since baking clears my head, I tried to bake something the day after B passed. B and his lovely wife George Ann (whom I consider my "other mother") have spent almost every Thanksgiving with us since we've lived in Georgia. Grandma Wanda makes B's favorite dessert each year - Lemon Meringue Pie. So, just for B, I made the pie. I'll admit I was scared that it would fall, weep, not set, etc., just like Grandma Wanda warns that it could. While I was making the pie though, I had a great sense of calm; if it didn't turn out, I would just toss it. No big deal. But I didn't have to throw it out. It was a perfect pie. The lemon was perfectly sweet yet tart, the meringue whipped into perfectly browned peaks. My only explanation is that B was looking over my shoulder helping me bake the pie. I think he would have been proud of it. He may not have been great at making pie, but he sure was great at eating it.

I'll miss you, B.

Lemon Meringue Pie
Adapted from Baking Illustrated

Lemon Filling:
1 cup sugar
1/4 cup cornstarch
1/8 teaspoon salt
1 1/2 cups cold water
6 large egg yolks
1 tablespoon grated zest and 1/2 cup lemon juice (I actually used 2 parts lemon juice, 1 part lime juice)
2 tablespoons unsalted butter

Meringue:
1 tablespoon cornstartch
1/3 cup water
1/4 teaspoon cream of tartar 1/2 cup sugar
4 large egg whites
1/2 teaspoon vanilla

1 pie crust recipe, baked for ten minutes and cooled (Let me suggest Grandma Wanda's recipe, or Pillsbury Pie Crust, which you can find in the refrigerated section near the biscuits/rolls)

For the Filling: Mix the sugar, cornstarch, salt and water in a large, nonreactive saucepan. Bring the mixture to a simmer over medium heat, whisking occasionally at the beginning of the process and more frequently as the mixture begins to thicken. When the mixture starts to simmer and turns translucent, whisk in the egg yolks, two at a time. Whisk in the zest, then the lemon juice, and finally the butter. Bring the mixture to a good simmer, whisking constantly. Remove from the heat; place plastic wrap directly on the surface of the filling to keep it hot and prevent a skin from forming.

For the Meringue: Mix the cornstarch with the water in a small saucepan; bring to a simmer, whisking occasionally at the beginning and more frequently as the mixture thickens. When the mixture starts to simmer and turns translucent, remove form the heat.

Adjust an over rack tot he middle position and heat the oven to 325 degrees. Mix the cream of tartar and sugar together. Beat the egg whites and vanilla until frothy. Beat in the sugar mixture, one tablespoon at a time, until the sugar is incorporated and the mixture forms soft peaks. Add the cornstarch mixture one tablespoon at a time; continue to beat the meringue to stiff peaks. Remove the plastic from the lemon filling and return to very low heat during last minute or so of beating the meringue (to ensure that the filling is hot).

Pour the hot filling in to the pie shell. Using a rubber spatula, immediately distribute the meringue evenly around the edge and then push to the center of the pie to keep it from sinking into the filling. Make sure to push the meringue to the edges of the piecrust to prevent shrinking. Use the back of a spoon to create peaks all over the meringue. Bake the pie until the meringue is golden brown, about 20 minutes. Transfer to a wire rack and cool to room temperature.

Wednesday, February 10, 2010

Love Stinks.


Valentine's Day is approaching so I decided to be cutesy and make some Red Velvet Whoopie Pies. Who wouldn't like a delightfully red heart-shaped treat? Working my way through the simple recipe I sampled the red batter that I managed to splatter all over including my face, the counter tops, my white shirt, and on the fridge (i'm not quite sure how it made its way over there?). I wasn't thrilled with the taste but I hoped it would improve after baking. Eh... not so much. Although the idea is absolutely adorable these whoopie pies were a sad disappointment. My night of baking left me with nothing but red hands and a garbage full of broken hearts.

One last thing, I'd like to say a huge THANK YOU to Nick our wonderful cousin; thanks to him we are now www.cookieconfessions.com !!


Monday, February 1, 2010

How NOT to Be a Domestic Goddess

Every time I bake, it makes me feel differently. Sometimes I bake when I’m angry, and it helps to calm me down. Sometimes I bake when I have a special occasion coming up, and I feel a sense of accomplishment when I’m finished. There are those select times, however, that baking leaves me with a sense of utter frustration and failure – much like what I experienced last week.

This was a cake wreck by all accounts. I carefully read the recipe (or so I thought) before heading to the store to pick up the ingredients I was lacking. I was attempting to make Night and Day Cupcakes from what is quickly becoming my favorite cookbook, “How to Be a Domestic Goddess.” It seemed simple enough: a chocolate cupcake with cream cheese-ish frosting. Well, that’s where I was wrong. Not only did I manage to leave out an ingredient altogether (I’m blaming this on my sous chef, who clearly wasn’t paying attention), but I also didn’t read the recipe carefully enough. It called for SELF-RISING cake flour, and I just had the all-purpose variety on hand. In order to counteract the lack of leavener, I added about a teaspoon of baking powder. There wasn’t even enough batter to pour into a whole cupcake sheet.

When I took them out of the oven, the cupcakes had risen only slightly, and that’s when I also realized that we had left out the vanilla. I tried to cover up my mistake by making some delicious frosting, but it was too late; the cupcakes were already a disaster. I find myself to be a complete failure after this debacle, but I’m going to put that behind me and bake something even better this week (because quite frankly, I can only go up from here)! No pictures this time around - they just weren't worth it.

Night and Day Cupcakes
Courtesy of Nigella Lawson - How to Be a Domestic Goddess

Cupcakes:
2 tablespoons cocoa powder (scant)0
2 tablespoons boiling water
1/4 cup sugar
1/4 cup dark brown sugar (scant)
3/4 cup self-rising cake flour
2 large eggs
1/2 cup very soft unsalted butter
1 teaspoon vanilla extract
1 tablespoon milk
12-cup muffin pan with paper baking cups

Frosting:
1 1/3 cups confectioners’ sugar, sifted
4 ounces cream cheese
Juice of ½ lime or tablespoon of lemon juice

Baking the cupcakes:
Preheat the oven to 400 degrees. Mix the cocoa to a paste with the boiling water and set aside while you make the cupcake mixture.

This couldn’t be easier (that’s a little encouragement from Nigella, not me): Just put the sugars, flour, eggs, butter and vanilla in a food processor and blitz to combine smoothly. Scrape the mixture from the sides and then pulse while you add the cocoa past and milk down the funnel. You should have a batter with a soft dropping consistency. If not, add a little more milk.

Dollop into the paper baking cups in the pan (about 1/2 to 3/4 full) and bake for 20 minutes, until an inserted cake tester comes out clean. Leave in the pan for five minutes, then remove, in the paper baking cups to a wire rack.

Making the frosting:
When the cupcakes are cool, make the frosting by beating together the sifted confectioners’ sugar and cream cheese until soft. Add lime or lemon juice to taste and then spread roughly over the waiting cupcakes. Stud each one with a chocolate-coated coffee bean or shave over some bittersweet chocolate.