Saturday, November 28, 2009

Caramel Crumb Bars


It's been a busy busy week for me. I was in Vegas last weekend and returned home just in time to prepare for the hectic pie season at the bakery. We chopped thousands of apples and baked hundreds of pies; Thanksgiving came and went without a hitch. Now I'm finally back to baking...

I recently bought a couple of new cookbooks including the Modern Baker by Nick Malgieri. These caramel bars were the first recipe I've tried from it but it has so many helpful tips and ideas to make delicious baked items in easier, more accessible ways. Nick claims that these are his favorite bars/cookies in the whole cookbook!

I apologize for my lack of posting the past week. I promise I will get working on a festive holiday post asap!

Hope everyone had a happy Thanksgiving! Enjoy.


Caramel Crumb Bars
Apapted from the Modern Baker by Nick Malgieri

2 sticks unsalted butter, softened
1/2 cup sugar
1/3 tsp salt
1 tsp vanilla
2 1/2 cups flour

filling:
1 (14 oz) can of sweetened condensed milk
1/4 cup brown sugar, firmly packed
1 tbsp light corn syrup
4 tbsp butter

Preheat oven to 350 degrees. Line a 9x13 inch pan with parchment paper and butter it. Using an electric mixer fitted with a paddle attachment beat together the butter, sugar and salt until light and fluffy (2-3 minutes). Add the vanilla. On low speed add in 2 1/4 cup flour and mix until flour is just absorbed. Be sure to scrap sides of the bowl to fully combine all the ingredients. Take 3/4 of the dough and press into the bottom of the prepared pan. Do not press the dough too firmly in the pan, chill the dough. Take the remaining 1/4 cup of flour and add it to the left over dough, mix with your hands until a crumble forms, set aside at room temperature.*

To make the filling add the sweetened condensed milk, brown sugar, butter and corn syrup to a medium sauce pan and bring to a simmer. Boil the ingredients, stirring continuously until it thickens and darkens in color (about 10 minutes). When the caramel is ready, remove from heat and allow it to cool in a stainless steel bowl for 5 minutes. Pour the caramel over the chilled dough and sprinkle with the crumble top. Bake the bars for about 30 minutes. Allow to cool thoroughly before cutting.

*Bakers Note: I added brown sugar to the crumble for a little extra sweetness.

Monday, November 23, 2009

Birthday Cake Is Always Best When You Don't Make It Yourself

I find that I am always extremely critical of my own baked goods. No matter how good others say it tastes (never how it looks though; we all know my creations are too rustic to be complimented on appearance), I am always looking at how to improve. It is because of this self-criticism that I truly enjoy when others bake for me. I am lucky enough to be a mentor to the sweetest 9-year-old ever. For my birthday last week, her mom had me over for an authentic Mexican lunch, complete with an authentic Mexican tradition. As I was taking the knife to the cake, they all rushed to stop me. "Take a bite," Vanesa said. I told her that I couldn't wait to try it after I cut everyone a piece. She then explained to me that it is tradition that the birthday girl take the first bite of the cake before it is cut. So, rather than go against years of Mexican tradition, I bit into the cake.


Regardless of whether they tricked me into making a fool of myself, I loved every minute of it. Vanesa decorated the cake herself, and it was definitely one of my favorite presents this year.

Friday, November 20, 2009

Gingersnaps


I just realized yesterday that the Holiday season is right around the corner. Thanksgiving is less than a week away, and we all know what that means- the start of over a month of non-stop parties, gatherings, shopping, eating and drinking. Although Halloween season is my favorite time of year (yes, I know that I am strange), the Holiday season runs a close second in my heart.

To get myself (and hopefully all of you) into the Thanksgiving spirit, I decided to bake something that centers around some holiday flavors: ginger and cinnamon. These cookies are extremely easy to whip up and are perfect to pair with a post-Thanksgiving dinner cup of coffee. Pass the turkey, please.

*I apologize for the horrible picture quality. I didn't have a camera to use at the time and iPhone obviously lacks in the "zoom" and "focus" functions of its camera...

Gingersnaps

2 cups flour
1½ teaspoons baking soda
½ teaspoon salt
2 teaspoons ground cinnamon
1½ teaspoons ground ginger
½ teaspoon ground black pepper
11 tablespoons butter, salted or unsalted, at room temperature
2/3 cup sugar
½ teaspoon vanilla extract
¼ cup mild-flavored molasses
1 large egg, at room temperature

1. Stir together the dry ingredients.

2. In the bowl of an electric mixer, or by hand, beat the butter just until soft and fluffy. Add the sugar and continue to beat until smooth, stopping the mixer to scrape down any butter clinging to the sides of the bowl.

3. Stir in the vanilla, molasses and egg.

4. Mix in the dry ingredients gradually until the dough is smooth.

5. Divide the dough in two equal portions and roll each on a lightly-floured surface until each is about 2-inches around. Don't worry if they're not perfect; you can neaten them up in a second.

6. Wrap each in plastic wrap then roll them lightly on the counter to smooth them out. Refrigerate, or better yet, freeze the cookie logs until firm.

7. To bake, preheat the oven to 350F and line a baking sheet with parchment paper or silicone baking mats.

8. Slice cookie dough into 1/4-inch rounds with a sharp knife. Leave a couple of inches between cookies since they'll spread while baking.

9. Bake for 10-14 minutes, rotating the baking sheets midway during baking, until deep-golden brown. The cookies will puff up a bit while baking, then settle down when they're done. Bake on the lower end of the range for softer cookies, and more for snappier ones, depending on your oven.

10. Let the cookies cool two minutes, then remove them with a spatula and transfer them to a cooling rack.


Sunday, November 15, 2009

Waffles with Warm Blueberry Sauce

Two of my jobs have the most opposite schedules; at the bakery I wake up super early and work all morning. The other, at a bar I start later in the afternoon and work until the wee hours of the night. My body is having a lot of trouble finding an efficient sleep schedule. I got to bed around 3:30 am last night and found that I couldn't sleep past 7:45 this morning. My inability to sleep in is how this delightful breakfast came to be.

These waffles were tasty and quick to whip up but the warm blueberry compote was the best part by far. It was an absolutely perfect breakfast for a chilly Sunday morning in Chicago.

Homemade Waffles

2 eggs
2 cups all-purpose flour
1 3/4 cup milk
1/2 cup vegetable oil
1 tbsp sugar
4 tsp baking powder
1/4 tsp salt
1 tsp vanilla extract
sprinkle of cinnamon (optional)

Preheat the waffle iron. Beat eggs until fluffy. Add in flour, milk, oil, sugar, baking powder, salt and vanilla. Stir until thoroughly combined, sprinkle in cinnamon. Pour mixture onto waffle iron and cook until golden brown. Serve HOT.

Warm Blueberry Sauce

2 cups fresh of frozen blueberries
1/4 cup water
1 cup orange juice
3/4 cup sugar
3 tbsp cornstarch (I didn't have any so I used flour)
1/2 tsp almond extract
1/8 tsp cinnamon
lemon juice, to taste

In a saucepan over medium heat combine blueberries, 1/4 cup water, orange juice and sugar, stirring gently and bring to a boil. In a small bowl combine cornstarch and 1/4 cup cold water. Carefully stir the cornstarch mixture into the blueberries until the sauce reaches desired thickness (should coat the back of a metal spoon). Remove from heat and stir in almond extract, cinnamon, and lemon juice. Add additional sugar, cinnamon or lemon to taste.

Saturday, November 14, 2009

A Morning in the Kitchen


Happy Saturday All! I hope everyone had a great week. I know I promised some "healthy" recipes next, but I was distracted by macaroons and a craving for something with chocolate.

I've been wanting to try to make french almond macaroons for a while. It seems like every foodblog has been making them. I used a Martha Stewart recipe that seemed the least complicated compared to the others. I've read many horror stories about the macaroon disasters and the stressful process. The appearance of mine was pretty good, however the taste - ehh not so much. When they first came out of the oven they were good, but now they have hardened and I think the almond meal I used was not as fine as it should have been. Oh well, I'll try again. Click here for Martha's French Almond Macaroon Recipe

Now, to supress my chocolate craving I tried to make blondies, but they turned into brownies because I have the patience of a 5 year old. I was supposed to wait and let the butter cool to room temperature before combining it, but I didn't... and the chocolate chips melted turning the whole mixture brown. However, these little blondie-brownies bars were still deeeelicious.

Blondie-Brownies with Butterscotch Chips and Marshmallows

1 cup butterscotch chips
1/2 cup (1 stick) butter
1 1/2 cup all-purpose flour
1 cup brown sugar
2 teaspoons baking powder
1/2 teaspoon salt
1 teaspoon vanilla extract
2 eggs
2 cups mini marshmallows
2 cups semi-sweet chocolate chips

Heat oven to 350 degrees. Grease a 13 x 9 baking dish.

In a sauce pan over medium heat, melt the butterscotch chips and butter, stirring constantly until smooth. When the butter and chips are melted and smooth remove from heat and transfer the contents of the pan to a mixing bowl. Be sure not to over heat the butter and butterscotch chips or they will separate and look chunky or curdled. Cool the mixture to room temperature (this is the step I did not wait for - if you want the bars to be blondies follow recipe accordingly). Using an electric mixer beat the flour, brown sugar, baking powder, salt, vanilla, and eggs into the butter and butterscotch mixture. You can add all the ingredients at once. Once ingredients are combined stir in the chocolate chips and marshmallows. Spread the batter evenly into the prepared ban. Bake for 25 minutes. The center will feel a little soft, but will firm while cooling. Let cool completely before cutting.

Wednesday, November 11, 2009

Raspberry Almond Coffee Cake


I've started reading a couple "healthy lifestyle" blogs, they are really interesting and inspiring. I'm feeling encouraged to attempt a healthier lifestyle. I guess this includes making healthy food choices, regular exercise, taking a multivitamin? (hm, maybe I have a little more reading to do)

I've decided this new lifestyle should include making some "healthy" baked items or maybe low-fat variations. It actually sounds like a great challenge. The following recipe does not fall into the healthy category, however you could consider it nutritional with its raspberry content. Fruit in any form is nutritious - right? So get ready kids, there will be some health-conscious baked goods in the near future. In the meantime, please enjoy this delightful recipe for Raspberry Almond Coffee Cake, with cream cheese and a crumble top. Full of caloric happiness :)


Raspberry Almond Coffee Cake
Adapted from Allrecipes.com

2 1/4 cup all-purpose flour
3/4 cup sugar
3/4 cup butter, cold
1/2 tsp baking soda
1/2 tsp baking powder
1/2 tsp salt
3/4 cup sour cream
1 egg, beaten
1 1/2 tsp almond extract

filling:
1 (8 oz) package cream cheese, softened
1/2 cup sugar
1 egg
1/2 cup raspberry jam or preserves
1/2 cup slivered almonds*

Preheat oven to 350 degrees F (325 for convection oven). In a large bowl combine flour and sugar. Cut in cold butter until the mixture is crumbly. Remove 1 cup of the mixture and set aside. Add in baking powder, baking soda and salt. Add the sour cream
, egg and almond extract mix well. Spread mixture into a greased 9-inch springform pan. Beat together cream cheese, sugar and egg and pour over batter in pan. Spoon jam on top and cover with extra crumble mixture and almonds. Baked for 55-60 minutes. Let stand for 15 minutes.

*Baker's note:
I didn't use almonds on the top, the crumble was enough crunch for us!

Tuesday, November 10, 2009

Big Love for Cakelove


Washington D.C. is quickly growing on me as one of my favorite cities in the U.S. It has everything you could ask for: stunning scenery, great shopping, amazing restaurants, and a very lively nightlife.

I was fortunate enough to visit D.C. this past weekend for a quick reunion with some friends. Although everyone else was happy just hanging around and chatting, I had one task that I needed to accomplish this weekend: visit at least one of D.C.'s well-known bakeries.

While shopping in Georgetown on Saturday, I made sure to allot time for my friends and I to make a stop at Georgetown Cupcake, one of D.C.'s only cupcakeries. Having read the bakery's backstory (two sisters quit their jobs and started their own little cupcake shop), I just knew I had to try one of their delicious little cakes.

Although we were tired, my friends and I walked a few final blocks to Georgetown Cupcake, spotting its cute black awning from down the street- only to be completely dismayed by the line to enter the store. It was literally wrapped around the block! We got in line and began to wait, but after about 15 minutes and barely any progress, we had to move on. I was a little disappointed, but I didn't let it get me down. There was another delicious baked good waiting for me somewhere in D.C.

The line at Georgetown Cupcake.

We woke up as early as we could on Sunday (quite difficult after a long night of, um, talking) and headed out to the next bakery on my list: Cakelove. Nestled in the fabulous U Street Corridor of the city, Cakelove is a bake shop that has grown from one location to six- and for very good reason.

We walked into Cakelove and were stopped dead in our tracks at the amazing variety of baked goods: cakes, bars, and cupcakes, all looking like absolute perfection. After going back and forth between the options, we decided on a vanilla cupcake with vanilla frosting, a red velvet cupcake, a chocolate Boston creme cupcake, and a vanilla caramel cupcake.

The cupcakes were absolutely amazing! The frosting was some of the best I've eaten in my life (and that means a lot coming from me) and the cake was light and airy. Whatever they are doing over there, they are doing it right.

Moral of the story: if you are in or around Washington, D.C., get into your car/onto your bike/onto the Metro and get over to Cakelove. There is a cupcake soulmate waiting for you.


Sunday, November 8, 2009

Snickerdoodles and Stuff


What a long tiring week this has been. I went from working a couple days a week to working 3 jobs and over 45 hours this week, I'm a little exhausted. I finally had a day off and lucky for me it was 70 degrees and sunny here in Chicago, but unfortunately I was catching up on sleep (running on 3 hours from the night before) and woke up at 12pm and found the rest of the day had passed me by before I had any energy to be productive. Once I got up and moving I did some laundry, cleaned up a bit and decided to make some snickerdoodles.

I decided to try out the convection oven this time and boyyy was it great. The circulating heat baked the cookies perfectly even and in a quick 7 minutes. They came out of the oven crunchy on the outside and soft in the inside, the way a great cookie should be. I did a little research before baking the cookies and found that when using a convection oven the temperature should be lowered by 20-25 degrees. I can't wait for my next convection baked item!

Another baking device that I have grown to love is the ice cream/dough scoop. Cookie making has been completely revolutionized for me. Its no longer a hassle to spoon out balls of dough, now its a quick one, two, done. I bought a wilton plastic scoop from Michael's, it only cost me about $2.00, whatta deal...but it broke on my first batch of cookies (I should've guessed). So I have upgraded to a delightful stainless steel spring-loaded scoop from Sur La Table (a gift from mom) and let me tell ya - it is wonderful, please see the perfect scoops below!


Does anyone have any baking tools they can't live without? You can never have to much kitchen "stuff".

click here for the Snickerdoodle recipe I used. I'm still too tired (or maybe its lazy) to re-type the recipe.


Saturday, November 7, 2009

Mint Brownies


This was the first Saturday morning working at the bakery and as it turned out one of the head bakers was out of town and the decorator had to leave early so I was given lots to work on. I baked trays and trays of cookies, cupcakes, and I sampled my first ever taste of pumpkin pie (I had no idea what I had been missing all these years!). I was also given the task of making cream cheese frosting, when I added the sugar I forgot to change the speed on the industrial sized mixer and POOF it was an explosion of white cloudy sugar everywhere. Not only did I cover myself completely from head to toe but anyone who was standing within 5 feet of me as well. I learned my lesson.

I made these brownies for all my pals at Vertigo. They are verrry decadent and they helped pass the time on an extremely slow Friday night at the bar. They are best served cold and in small amounts. Katie's friend Michelle used to make these all the time back in the day, I couldn't find her recipe anywhere but I found a similar one online. Enjoy.


Mint Brownies
Adapted from Joyofbaking.com

Brownie Layer:
1/2 cup unsalted butter, cut into pieces
4 ounces dark chocolate, coarsely chopped
1 1/4 cups granulated white sugar
1 teaspoon pure vanilla extract
2 large eggs
1/2 cup all purpose flour
1/4 teaspoon salt

Mint Layer:
2 tablespoons unsalted butter, at room temperature
1 cup confectioners sugar, sifted
1 tablespoon heavy cream
1/2 teaspoon pure peppermint extract or 1-2 tablespoons crème de menthe
green food coloring (optional)

Chocolate Glaze:
3 ounces (90 grams) semisweet chocolate, chopped
1 tablespoon unsalted butter

Preheat oven to 350 degrees F. Prepare a 9x9 inch pan lined with parchment paper (extra over the sides).

In a stainless steel (heatproof) bowl placed over a saucepan of simmering water, melt the butter and chocolate. Remove from heat and stir in the sugar and vanilla extract. Add the eggs, one at a time, beating well with a wooden spoon after each addition. Stir in the flour and salt and beat, until the batter is smooth and glossy, about one minute. Pour the brownie batter evenly into the prepared pan. Bake for 25 minutes, edges should be slightly browned, inserted toothpick should come out clean. Cool completely.

To make the mint layer beat together all the ingredients until smooth. If the frosting is too thick add more cream. Spread the frosting over the cooled brownies and refrigerate for 5-10 minutes or until firm.

To make the chocolate layer use a heatproof bowl over a saucepan of simmering water, melt the chocolate and butter. Spread over the mint filling and refrigerate for about 30 minutes or until the chocolate glaze starts to dull.

Thursday, November 5, 2009

Baking News and Oatmeal Scotchies


It's been a busy week for me, I got a new job at a bakery! Thanks to my Aunt Donna they hired me without having any real baking experience. I am pretty much the official counter girl for the up-coming holiday season but I am baking as well, which is super exciting. Tuesday was my first day, along with learning the products and register functions I made snickerdoodle cookies with the owner. All the girls at the bakery are amazingly wonderful and sooo helpful. I am really lucky to have found such a great place to work and I'm already learning a lot from watching these talented bakers!

Here is a recipe for Oatmeal Scotchies that I made for my momma, she said they are her favorite but I'm pretty sure I've never seen her eat one of these before. Anyway, this recipe is straight off the toll house bag... enjoy.

Toll House Oatmeal Scotchies
1 1/4 cups all-purpose flour
1 teaspoon baking soda
1/2 teaspoon salt
1/2 teaspoon ground cinnamon
1 cup (2 sticks) butter or margarine, softened
3/4 cup granulated sugar
3/4 cup packed brown sugar
2 large eggs
1 teaspoon vanilla extract
3 cups quick or old-fashioned oats
1 2/3 cups (11-oz. pkg.) butterscotch chips

Preheat oven to 375 degrees F. Combine flour, baking soda, salt and cinnamon in small bowl. Beat butter, granulated sugar, brown sugar, eggs and vanilla extract in large mixer bowl. Gradually beat in flour mixture. Stir in oats and morsels. Drop by rounded tablespoon onto ungreased baking sheets. Bake for 7 to 8 minutes for chewy cookies or 9 to 10 minutes for crisp cookies. Cool on baking sheets for 2 minutes; remove to wire racks to cool completely.

Baker's Note: I made some with chocolate chips and butterscotch chips, delicious.


Sunday, November 1, 2009

Vanilla Marshmallows


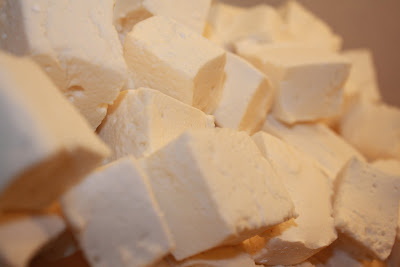
Tonight we enjoyed rich hot chocolate with homemade vanilla marshmallows. We don't usually like to drink our calories around here but I'm just trying to fatten everyone up for insulation purposes as the cold winter months are approaching.

Homemade marshmallows are nothing like the store bought kind. They are dense but light, still sticky and chewy but they have this gourmet look and a hint of vanilla flavor. They melted perfectly into the hot chocolate and I can only imagine how good they would be inside some kind of baked good....

Give them a try - I'm planning on dipping them in chocolate or caramel next time.

Vanilla Marshmallows
Adapted from Giada Laurentis and Baked: New Frontiers in Baking

1/2 cup and 1/4 cup water
3 tbsp gelatin
2 cups sugar
1/2 cup evaporated milk
2 tsp. vanilla extract
pinch of salt


Butter an 8x8 inch pan and coat in powdered sugar. In a large mixing bowl pour 1/2 cup water then sprinkle in the gelatin. Allow the gelatin to soften for about 10 minutes. In a medium sized sauce pan pour in sugar, evaporated milk and 1/4 cup water. Stir on low heat until sugar is dissolved. Bring mixture to a simmer and cook until candy thermometer reads 240 degrees F, about 10-12 minutes. Pour this mixture into the gelatin and beat on low speed until incorporated. Beat the mixture on high speed until it is thick and has doubled in size. Add in the vanilla and salt. Quickly pour the mixture into the buttered and sugared pan. Allow the marshmallows to sit in a cool place for at least 8 hours or overnight. Use scissors to cut the marshmallows into squares.